Practical, workshop-tested leathercraft guides written from the bench.
Clear processes, real-world experience, and tools that hold up over time.
-

Beginner’s Leathercraft Starter Checklist — Free Download
A free printable leathercraft starter checklist for UK makers — available in a quick-reference version and a full guide with notes, tips, and leather guidance. No fluff, no American suppliers.
-
Beginner’s Leathercraft Starter Guide
To start leathercraft you need a small set of quality tools covering cutting, stitching, and edge finishing — not a large kit. Begin with simple projects like key fobs and card holders, use vegetable-tanned leather, and focus on learning the process rather than completing impressive pieces. Quality over quantity at the start makes a significant…
-
First Leathercraft Tools: What You Actually Need
The tools you actually need for leathercraft cover five processes: cutting, marking, punching, stitching, and edge finishing. A snap-off knife, metal ruler, pricking iron, mallet, harness needles, waxed thread, glue, edge beveller, and a burnishing product will cover all of these. Everything else can wait until you have learned those basics and know exactly what…
-
Leatherworking on a Budget Without Buying the Wrong Tools
You can start leatherworking on a modest budget by buying a small number of essential tools rather than a large cheap kit. The biggest budget mistake is spending on poor-quality cutting tools, pricking irons, and edge bevellers — these are the tools that affect your results most. Budget well on the tools you use most,…
-
Simple Leather Projects for Building Core Skills
The best beginner leather projects are key fobs, card holders, simple straps, and notebook covers. These are not chosen because they look impressive — they are chosen because they teach the skills that matter: clean cutting, consistent stitching, and proper edge finishing. A key fob done cleanly teaches more than a bag done badly.
-
Vegetable-Tanned Leather Basics for Beginners
Vegetable-tanned leather is leather that has been tanned using plant-derived tannins in a slow, traditional process. It is firmer and more structured than chrome-tanned leather, takes edge finishing and burnishing well, and develops a patina with age and use. It is the standard choice for hand leatherwork — wallets, belts, bags, and small goods —…
-

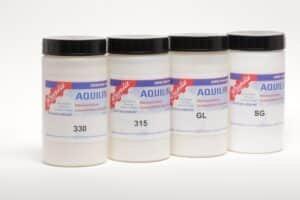
Renia Aquilim — The Complete Guide for Leathercraft
A complete guide to Renia Aquilim water-based adhesives for leathercraft — covering all four products, which to choose, how to use them, and what to know about storage.
-
Choosing Leather Thickness for Wallets, Belts, and Small Goods
Leather thickness is measured in millimetres and should match the project. Wallets use 0.8–1.5mm, card holders 1–1.5mm, bags 2–3mm, and belts 3–4.5mm. Too thin and the piece loses structure; too thick and it becomes hard to stitch, fold, and finish cleanly.
-
Hand Stitching Leather for Beginners
Hand stitching leather uses the saddle stitch method — two needles, one on each end of the thread, passing through the same pre-punched holes in opposite directions. This locks the thread at each hole so a broken stitch does not run. To hand stitch leather you need a pricking iron to mark and punch the…
-
Why Your Leather Stitching Looks Uneven and How to Fix It
Uneven leather stitching almost always has a specific cause rather than being a general skill problem. The five most common causes are inconsistent pricking iron holes, unequal tension between the two needles, thread twist, a shifting stitch angle, and a thread-to-hole mismatch. Work through each cause systematically and the problem will narrow down quickly.
-
Stitching Pony Basics: Why It Helps and When to Use One
A stitching pony holds your leather work at a consistent height and angle while you stitch, freeing both hands to control the thread and needles properly. It is not essential for short stitch runs on simple projects, but makes a real difference to stitch consistency on longer pieces — belts, bag panels, and anything where…
-
Choosing the Right Thread and Needle for Leathercraft
For hand leatherwork, use waxed polyester thread matched to the leather weight — 0.55mm for fine small goods such as card holders and slim wallets, 0.65mm for wallet-weight and mid-weight work. Pair with blunt-tipped harness needles (John James L3912 range, size 002 for most work). The thread should fill the pricking iron hole cleanly without…
-
What Thread Size Should You Use for Leather?
For most hand leathercraft, 0.55mm thread suits fine small-goods work — card holders, slim wallets, and key fobs at closer stitch spacing. A 0.65mm thread is the more versatile choice for general stitching on wallet-weight to mid-weight leather. The thread should fill the hole made by the pricking iron cleanly without being forced through it.
-
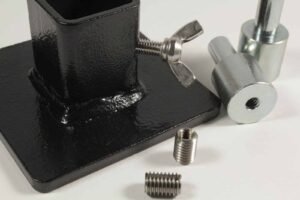
Turning Your Arbor Press into a Multi-Tool: How I Use the Hideout Craft Adapter Set
Turn a standard arbor press into a far more versatile leatherworking tool with the Hideout Craft Adapter Set. This guide explains how the system works in real workshop use — from die cutting and flat pressing to rivet setters, logo stamps, and threaded letter stamp systems using M8, M5, and 1/4″ UNC tooling.
-
Linen vs Polyester Thread for Leathercraft
Waxed polyester thread is the practical standard for most hand leatherwork — consistent, strong, does not rot, and runs smoothly without additional treatment. Linen thread is the traditional choice with a slightly textured surface and a more organic appearance; it requires waxing before use. Both produce excellent results when used correctly; polyester is the sensible…
-
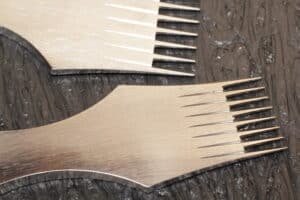
Choosing a Pricking Iron for Leatherwork
A pricking iron sets the stitch spacing and hole profile for all hand stitching. French-style irons produce narrow, slanted slits. Diamond-style irons produce diamond-shaped holes. The finished appearance also depends on spacing, thread, leather and stitching technique. Spacing — typically 3mm to 4mm for most hand leatherwork — should match the leather weight and thread…
-
Pricking Irons, Chisels, and Awls: How They Work Together
Traditional pricking irons mark spacing for an awl, while modern through-punch irons and stitching chisels can form holes directly. Learn when each method applies.
-
Choosing and Using a Leather Awl
A leather awl opens stitch holes cleanly so a needle and thread can pass through. It is used alongside a pricking iron — the iron marks the position and spacing, the awl opens each hole fully just before stitching. A diamond awl blade is the standard choice for saddle stitching on vegetable-tanned leather. It must…
-
Edge Finishing for Beginners
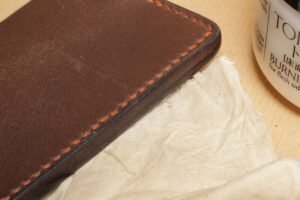
Leather edge finishing is a five-step sequence: cut the edge cleanly, bevel both sides with an edge beveller, sand through progressively finer grits, apply a small amount of burnishing compound, and burnish with firm, consistent strokes. Each step prepares the edge for the next. Skipping the bevel step makes a proper rounded finish impossible.
-
Common Leather Edge Finishing Mistakes and How to Fix Them
The most common leather edge finishing mistakes are skipping the bevel step (which leaves a flat, square edge that won’t burnish into a rounded profile), applying too much burnishing compound, and not sanding properly before burnishing. Most edge problems trace back to preparation rather than the wrong product. Fix each issue by going back to…
-
Tokonole vs Gum Tragacanth: Which Should You Use?
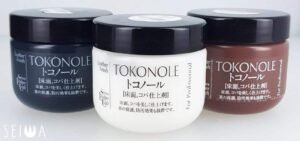
Tokonole and Gum Tragacanth are both water-based edge burnishing compounds for vegetable-tanned leather. Tokonole gives a slightly more polished, consistent result and is available in clear, brown, and black. Gum Tragacanth is the traditional product, giving a slightly drier, more natural finish. For most makers, Tokonole is the more predictable starting choice.
-
How to Burnish Leather Edges with Tokonole
To burnish leather edges with Tokonole: cut the edge cleanly, bevel both sides with an edge beveller, sand through medium and fine grit, apply a small amount of Tokonole, and burnish immediately with firm back-and-forth strokes. The friction compresses the fibres into a smooth, dense edge. Repeat as needed; stop when the edge is compact…
-
Leather Edge Bevelling Explained
Edge bevelling removes the sharp corner from both sides of a cut leather edge using a small cutting tool called an edge beveller. This creates a chamfered profile that allows burnishing compound to compress the edge into a smooth, rounded shape. Without bevelling, the edge stays flat and square regardless of how carefully the rest…
-
Cutting Leather Cleanly: Knife Control, Blades, and Layout
Clean leather cutting starts with a sharp blade — a fresh snap-off section, a stropped knife, or a titanium rotary cutter — used with a metal straight edge on a firm cutting mat. Mark cut lines clearly before cutting, draw the blade in a single deliberate pass with consistent pressure, and keep the blade perpendicular…
-
Skiving Leather by Hand: What It Is and When to Use It
Skiving is the technique of thinning leather at specific points by removing material from the flesh side with a sharp skiving knife. It is used at fold lines, edge joins, and overlapping construction areas where full-thickness leather would create excessive bulk. A gradual taper — not an abrupt cut — is what makes it work.…
-
How to Use a Leather Strap Cutter
A leather strap cutter cuts long, parallel straps at a consistent width using a blade set at a fixed distance from a fence that references off the leather’s straight edge. Set the width, confirm it on a test piece, then draw the tool firmly along the leather in a single consistent pass. It is most…
-
Leather Adhesives: Choosing the Right Glue
For most hand leatherwork, a contact adhesive is the right choice — applied to both surfaces, allowed to become tacky, then pressed firmly together. Renia Aquilim 315 suits general assembly work; Aquilim 330 for maximum bond strength; Aquilim GL for a water-based option. Fiebing’s Leathercraft Cement is a reliable starting choice for beginners.
-
Water-Based Leather Glue Explained
Water-based leather adhesives use water rather than organic solvents as the carrier, producing a product with significantly lower odour and solvent exposure. The full Renia Aquilim range — 315, 330, GL and SG — is water-based, with 330 the one built specifically for leathercraft and our first recommendation; Renia’s own Gummilösung is the solvent-based alternative…
-
Dyeing Vegetable-Tanned Leather: A Practical Beginner Guide
Dyeing vegetable-tanned leather uses alcohol-based dye applied in thin, even coats over a deglazed surface. Deglaze the leather first to remove surface treatments that prevent even dye absorption. Apply dye with a wool dauber in consistent strokes, allowing each coat to dry fully before adding the next. Multiple thin coats produce more even, deeper colour…
-
Finishing Leather After Dyeing
After dyeing vegetable-tanned leather, allow it to dry fully, buff the surface lightly with a clean cloth, then apply Fiebing’s Resolene (a water-based acrylic sealant) in thin, even coats. Once the sealant is dry, condition the leather to restore suppleness. This seals the dye against transfer and surface abrasion, and protects the leather in use.…
-
Punching Clean Holes in Leather
Punching clean leather holes requires the right punch diameter, firm support underneath (a dense rubber cutting mat), and one decisive mallet strike — not multiple tentative ones. Mark hole positions accurately before punching. A dull punch compresses and tears rather than cutting cleanly, so keep punch tips sharp. An arbor press produces more consistent results…
-
Choosing Boards, Mats, and Punching Surfaces for Leathercraft
Leathercraft requires different surfaces for different tasks. A self-healing cutting mat is for knife work — cutting panels and straight cuts. Dense rubber or a nylon cutting board is for drive punch and chisel work. Glass or marble is suitable for skiving and flat work. Using the wrong surface — particularly punching on a cutting…
-
Rivets, Chicago Screws, and Snaps Explained
Rivets are permanent two-part metal fasteners for structural joins that will never need to open. Chicago screws are threaded two-part fittings that can be removed and replaced — used where the connection may need to be undone. Snaps are press-stud closures for bags, pouches, and flaps that open and close repeatedly. Each has a specific…
-
How to Choose the Right Rivet Size
Choosing the right rivet requires matching two dimensions: cap diameter (proportionate to the leather weight and aesthetically appropriate for the application) and post length (which must match the combined thickness of the layers being joined). Measure the total leather thickness and add 1–2mm for setting. Test on scrap leather before setting on the final piece…
-
Chicago Screws vs Rivets for Leatherwork
The fundamental difference is reversibility. Rivets are permanent — once set, the post is flared and cannot be removed without cutting or damage. Chicago screws are threaded and can be undone with a screwdriver, making them suitable wherever the connection may need to be removed or replaced. Use rivets for permanent structural joins; use Chicago…
-
Belt Buckles for Leatherwork
A belt buckle must be sized so the internal bar width matches the strap width exactly — 32mm buckle for a 32mm strap, and so on. The two main styles are heel bar (the most common for personal belts) and centre bar. Metal quality matters: a properly made buckle should feel substantial with no flex…
-
Making a Simple Leather Belt: Tools, Hardware, and Workflow
Making a leather belt requires firm vegetable-tanned leather at 3–4mm, a buckle matched to the strap width, and core skills: cutting, edge finishing, hole punching, and stitching. The key sequence is cut the strap, pre-finish the long edges before assembly, cut the buckle tongue slot, attach and stitch the buckle fold, punch the adjustment holes…
-
Tool Care and Sharpening Basics for Leathercraft
The most important leathercraft tool maintenance is regular stropping — drawing the tool bevel against a leather strop loaded with polishing compound. A few strokes per session maintains cutting edges on edge bevellers, skiving knives, awl blades, and cutting knives. When a tool has become noticeably dull, sharpen on fine wet and dry paper before…