Complete Guide to Leather Edge Finishing (Vegetable-Tanned Leather)
Vegetable-tanned leather rewards precision. It compresses and slicks beautifully — but only when the preparation is correct.
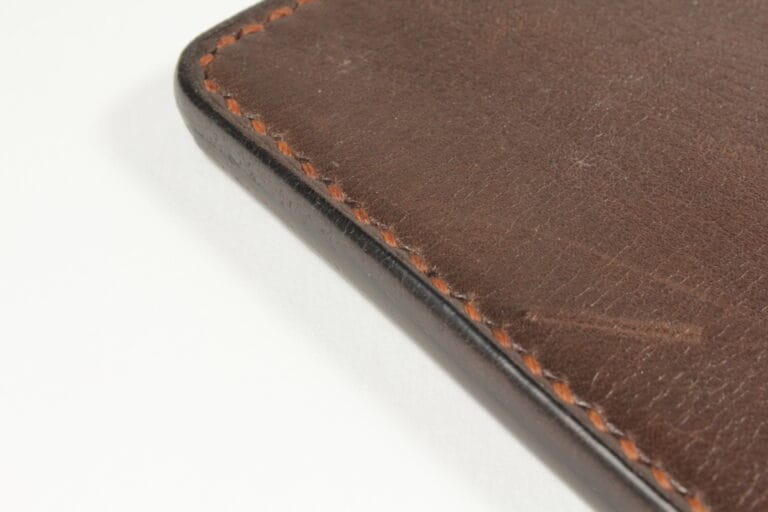
Edge finishing is not a cosmetic afterthought. It is part of the build. Clean stitching and accurate cutting mean very little if the edges remain uneven or fibrous.
This guide explains how to properly finish leather edges step by step — covering sanding, beveling, burnishing, and the use of compounds such as Tokonole or Gum Tragacanth.
The process below is the method I use to achieve consistent, durable edges on vegetable-tanned leather.
How to Finish Leather Edges (Step-by-Step Process)
1. Preparation: I Sand Before I Bevel
On vegetable-tanned leather, I always sand before beveling.
This removes minor irregularities from cutting and ensures the bevel sits on a uniform, level edge.
My grit progression:
- 180 grit – initial levelling
- 320 grit – refining
- 600 grit – smoothing
- Lightly dampen the edge
- 800 grit – compression refinement
- Lightly dampen again
- 1000 grit – final preparation
Between 600 and 800 grit, I lightly dampen the edge with water using my finger. This helps control loose fibres and begins compressing them rather than simply abrading them.
I repeat that light dampening between 800 and 1000 grit. The aim is to encourage the fibres to lie flat before any compound is introduced.
If grit stages are skipped, fibres almost always lift later in the process. Preparation determines the final result.
2. Bevel After Levelling
Once the edge is properly levelled, I bevel both sides.
Beveling after sanding gives:
- Cleaner compression
- A more consistent radius
- Better compound control
The beveler size must match the leather thickness. Too large weakens the edge. Too small leaves sharp corners that won’t compress properly.
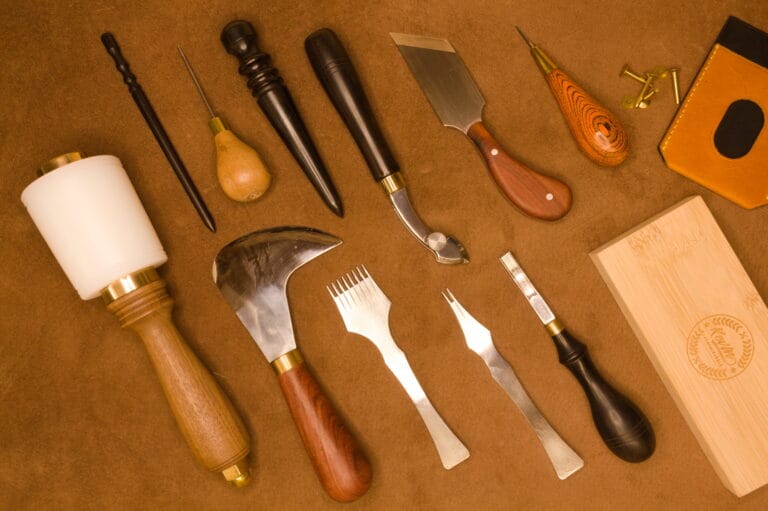
👉 Browse edge bevelers
3. Choosing Between Tokonole and Gum Tragacanth
Both Tokonole and Gum Tragacanth are widely used for leather edge finishing. While the preparation remains the same, each compound produces a slightly different look and feel. The right choice depends on the project and the character you want in the finished edge.
When I Use Tokonole
I reach for Tokonole when:
- I’m building new designs
- I want a clean, modern aesthetic
- I need consistent, predictable results
Tokonole compresses fibres cleanly and produces a refined finish — provided the preparation has been done properly.
👉 Explore Tokonole
When I Use Gum Tragacanth
I use Gum Tragacanth for more traditional builds, especially strap work where I want a classical character to the finish.
It requires slightly more attention during burnishing, but the result feels more traditional in appearance and texture.
Neither product compensates for rushed sanding. Compound enhances preparation — it does not replace it.
4. Burnishing: Hand vs Machine
The method depends entirely on the project.
Hand Burnishing
For small goods and bags, I prefer hand burnishing. A wooden slicker or canvas gives excellent tactile feedback and allows precise control, especially around tighter curves and detailed work.
Machine Burnishing
For belts and long straps, I use a Nigel Armitage Just Wood round burnisher mounted on a converted bench grinder.
There is also a practical reason for this. After years of typing, I experience some wrist strain, and extended hand burnishing on long straps can aggravate it. Using a motorised burnisher allows me to maintain consistency without overworking my wrist.
Machine burnishing provides efficiency and uniformity — but it amplifies preparation quality. It does not correct poor edge prep.
5. Second Pass Refinement
On higher-end pieces, I perform a second pass.
After the first burnish:
- I allow the edge to dry fully
- Lightly sand again at 800–1000 grit
- Apply a very small amount of compound
- Burnish again with controlled pressure
This tightens the surface further and improves long-term durability, particularly on belts and straps that will flex repeatedly.
If heavy re-application of compound is required, the initial preparation was likely insufficient.
6. Common Edge Finishing Mistakes
Even experienced makers fall into these traps:
- Skipping grit stages
- Applying too much compound
- Burnishing before fibres are properly levelled
- Using the wrong beveler size
- Attempting to correct poor preparation with more product
Edge finishing is cumulative. Each stage builds on the previous one.
Recommended Setup for Vegetable-Tanned Leather
For consistent results, I rely on:
- Sandpaper from 180–1000 grit
- A quality edge beveler matched to thickness
- Tokonole for modern builds
- Gum Tragacanth for traditional builds
- A wooden slicker or motorised burnisher
Each tool has a role. None compensate for rushed preparation.
Frequently Asked Questions About Edge Finishing
Should you bevel before sanding?
On vegetable-tanned leather, I prefer sanding first to level the edge, then beveling. This allows the bevel to sit on a uniform surface and compress more cleanly during burnishing.
Can you burnish vegetable-tanned leather with just water?
Water alone can compress fibres temporarily, but it does not seal them. For durability and consistency, I use either Tokonole or Gum Tragacanth after proper sanding.
How smooth should the edge be before applying compound?
The edge should be level and refined up to at least 800–1000 grit before compound is applied. Compound enhances preparation — it does not replace it.
Do you always need a motorised burnisher?
No. Hand burnishing works perfectly for small goods and detailed pieces. I use a motorised burnisher primarily for belts and long straps to maintain consistency and reduce strain.