Choosing a Pricking Iron – What Actually Matters
Pricking irons are one of those tools that divide opinion more than almost anything else in leathercraft.
Spacing. Tooth count. Handle height. Whether to punch through or just mark. There is a lot of noise around them, and most of it comes from people who have tried a few options rather than worked seriously with one set over time.
I have strong opinions on this. I will share them plainly.
What a Pricking Iron Actually Does
A pricking iron creates evenly spaced marks or holes along a stitch line. Depending on how you use it — and which iron you choose — it either marks the surface for an awl to follow, or punches through the leather entirely.
That distinction matters more than most beginners realise.
Draw Your Stitch Line First — Every Time
Before the iron goes anywhere near the leather, you need a stitch line.
This is the step that beginners most often rush, and it is the one that matters most. A crooked or inconsistent stitch line cannot be rescued by careful ironing or precise stitching. The line is the foundation. Everything else follows it.
I use a wing divider — running one leg along the outer edge of the work and the other scribing a line at a consistent distance. Three to five millimetres is the typical range depending on the project. For most work I use either end of that range — 3mm for finer pieces, 5mm for heavier builds.
The technique does not take long to master. Set the divider, run it along the edge, and let the tool do the work. After a short amount of practice it becomes automatic — consistent, repeatable, and fast. But it must be practiced until it is right. A line drawn with dividers following the edge looks different to one ruled with a straight edge. The divider-drawn line echoes the shape of the piece. That matters in the finished work.
Get this right before anything else.
Marking vs Punching Through
Many irons are designed to mark only — to create a guide for the awl rather than a finished hole. The irons I use and stock are designed to punch through completely.
My preference is to punch through with the iron and then open and angle each hole with an awl before stitching. This gives me the even spacing of the iron combined with the control and angle of hand awling. The needle follows cleanly, thread tension is consistent, and the finished stitch sits where it should.
If you mark only and rely entirely on the awl for sizing, you introduce more variables. The hole size becomes dependent on how hard you drive the awl each time. That inconsistency shows in the finished seam.
Punch through, then awl. That is the sequence that works for me.
Why Handle Height Matters
This is something that rarely gets discussed and makes a significant practical difference.
The Kevin Lee pricking irons I stock have noticeably taller handles than most irons at a similar price point. That height exists for a reason.
When you set the iron on the leather and look down at it, a tall handle gives you a clear vertical reference before you strike. You can see immediately whether the iron is sitting perfectly upright or whether it has drifted. You correct it before the mallet lands, not after.
With a short-handled iron that visual reference is harder to read. The iron goes in at a slight angle, the holes are angled, and the stitch sits inconsistently. You may not even notice until you are three-quarters through a seam.
Keeping the iron perfectly vertical is the single most important thing you can do for consistent stitching. The handle height makes that easier.
Browse Kevin Lee pricking irons at Hideout Craft
Spacing — What I Use and Why
I work mostly with 3.85mm. It sits between fine and robust and handles a wide range of projects well — wallets, bags, belts, straps — without looking too delicate or too heavy. For finer or more detailed work I reach for smaller pitches: 3.38mm or 2.7mm. Tighter spacing, more refined seam, more precision required at the awling stage. For larger items or a deliberately heavier look, 4mm to 5mm comes into its own.
Those are my working references, not rules. The spacing you end up using most will be shaped by the kind of work you make, the leather you work with, and what looks right to your eye over time. There is no single correct answer — there is only the spacing that suits your work.
If you are finding your bearings, 3.85mm is a reasonable place to start. It is forgiving enough to learn on and versatile enough to stay useful long after the early stages.
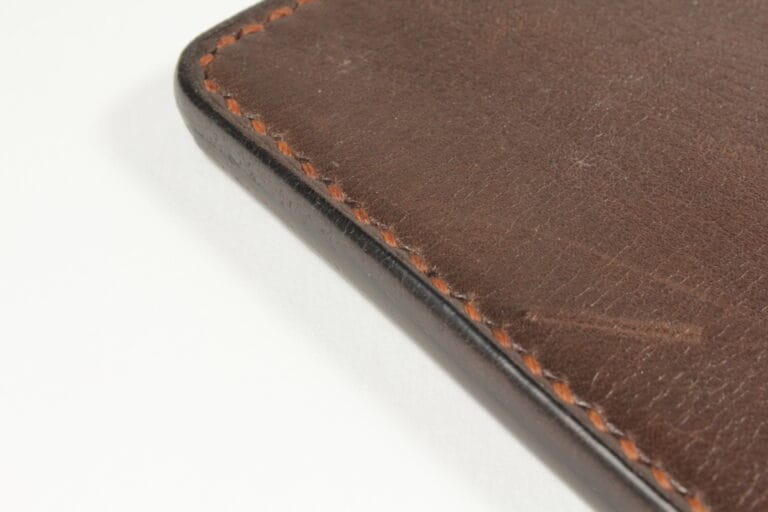
A Word on Stitch Aesthetics
If you have watched beginner leathercraft videos you will have noticed that a lot of them feature large, bold stitching. Wide spacing, thick thread, pronounced holes. It photographs well, and for some pieces — heavy-duty work, rustic builds, saddlery — it is exactly right. Some items genuinely suit that bold character.
But as your technique develops and your eye sharpens, you start to want more control over what the seam actually looks like. Finer spacing with finer thread produces a significantly more elegant result. The kind of stitching you see on quality handmade goods where the seam is present but not the dominant feature of the piece.
Neither approach is better. It is personal preference. But here is the thing — you cannot achieve refined, close stitching with a wide-pitch iron, and you cannot get that bold rustic look with a fine iron and fine thread. The iron spacing is what gives you that control. Choose the spacing that suits the work you want to make.
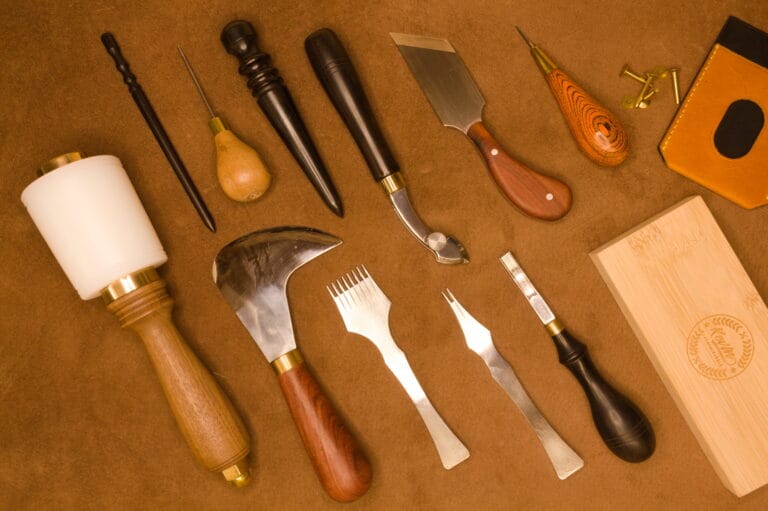
Tooth Count
The tooth count determines how many holes you punch in one strike.
A 2-tooth iron is for curves, corners, and starting or finishing a line. You need control in those areas and a longer iron becomes awkward. I pick up the 2-tooth constantly.
An 8-tooth or 12-tooth iron covers ground efficiently on straight runs. The more teeth, the faster the work on long straight sections — but you trade some control for speed.
I use all three in my own work. If you could only buy one set to start, a 2-tooth and an 8-tooth covers most situations well. The 12-tooth becomes useful when you are doing a lot of belt and strap work.
Kevin Lee 2-tooth, 8-tooth, and 12-tooth pricking irons — 3.85mm pitch
Starting a Stitch Line Correctly
When you begin a stitch line, the first tooth should sit just off the edge of the work — not on it. That positions your first actual hole correctly and ensures the spacing reads evenly from the very start.
On longer pieces, I mark a physical reference point at both ends before I begin. That way the spacing reads symmetrically from each end toward the middle, rather than running out awkwardly at the far end. It takes an extra minute. It makes the finished seam look considered rather than accidental.
The Maul, Not the Hammer
For driving pricking irons I use a maul. The round head concentrates the strike directly through the iron — less energy dispersed sideways, a cleaner transfer into the leather. That is the mechanical reason it works better than a claw hammer or a square-faced mallet for this kind of work.
Mauls come in two main shapes: straight and tapered. Both work well. It comes down to how you sit at the bench and how you strike. I use the tapered maul most — the way I work at an angle on my bench, the taper suits the arc of my strike and feels natural. Someone with a different posture or a different bench setup might reach for the straight version every time.
I own a tapered maul, a straight maul, and a mallet. The mallet has a wider striking face and a different feel — useful in its own right and by no means the wrong choice. After working with all three regularly I still reach for the tapered maul most often, but that is my preference shaped by my bench and my habits. A mallet used consistently will produce a clean result. The goal is the same with any of them: one controlled strike per position, iron in cleanly, iron out cleanly.
Tapered craftsman’s maul at Hideout Craft
What Makes a Quality Iron
Consistency of spacing across the full tooth count. Sharpness that lasts. A handle that gives you useful visual feedback when setting the iron.
Cheap irons often have inconsistent spacing — teeth that are almost right rather than exactly right. Over a long seam that compounds. By the end, the stitch line tells a story you did not intend.
The irons I stock are the ones I use myself. That is not marketing — it is the reason I chose them in the first place.
Building Your Bench Over Time
Many makers arrive at leathercraft through a starter kit or a handful of budget tools bought elsewhere. That is a natural entry point — you want to try the craft before committing, and that makes complete sense. What tends to happen is that the work itself teaches you where quality makes a difference. Some tools reveal themselves as worth upgrading early. Others serve you reliably for years at exactly the price you paid.
The snap-off utility knife is a good example of the second kind. Mine gets heavy use. It is not a premium tool — it is a practical, reliable workhorse that does not need to be anything more.
Pricking irons, awls, and edge creasers tend to fall into the first category. Inconsistent spacing, soft steel, poor balance — these things compound over a long seam or a complex piece in ways that are difficult to ignore. Those are the tools where the difference in quality is felt most directly in the work.
If you are starting out properly rather than through a cheap kit, you do not need to go budget first and upgrade later. The range at Hideout Craft covers both ends: accessible quality tools from reputable suppliers — not no-name products — and premium tools for makers who want the best available. Neither end of the range is throwaway. Everything is sourced and tested before it is stocked.
Over time, every maker acquires more tools than they expected. Some get used daily. Some sit quieter but have a clear purpose when the right project comes along. That is not a mistake — that is just how a working bench develops. The tools you reach for least are not necessarily the wrong choice; they are simply waiting for the right job.
The tools I sell are ones I use or have tested in my own leathercraft work. Quality is the threshold for what gets stocked, and the range will grow over time to give you more to choose from. Where I share preferences — a size, a shape, a striking tool — they are mine, shaped by my bench and my work. Treat them as a reference point, not a prescription. Your hands and your projects will tell you what works for you.
Frequently Asked Questions
What is the best pricking iron spacing for beginners?
There is no single correct answer — any guide that gives you one is oversimplifying. That said, 3.85mm is a reasonable starting point for most makers. It is forgiving enough to learn on and works across wallets, bags, straps, and most early projects. What you end up reaching for most will be shaped by the kind of work you make and the eye you develop over time.
Should I punch all the way through or just mark?
I punch all the way through and then open and angle each hole with an awl before stitching. Consistent spacing from the iron, consistent angle from the awl. Marking only introduces more variables at the awling stage.
How do I keep my pricking iron vertical when striking?
A tall-handled iron gives you a visible vertical reference before you strike. Look directly down from above before each strike and correct any tilt before the mallet lands. Take your time early on. Speed comes after consistency.
What size maul should I use?
It depends on the leather thickness, your working posture, and what feels natural in your hand. A tapered maul in the 340 to 450 gram range works well across most leather thicknesses — that is what I use. Too light and you need multiple strikes; too heavy and control suffers. Whether you settle on a straight maul, a tapered maul, or a mallet is personal preference. The goal with any of them is the same: one clean, controlled strike per position.
Why do expensive leather goods have such tight, fine stitching?
Fine spacing — 2.7mm or tighter — with correspondingly fine thread is a deliberate aesthetic choice. It requires more precise awl work and more patience, but the result is significantly more refined. The iron spacing is what makes it possible — you cannot achieve it with a wide-pitch iron.